- style
Installation
- George Lewe
Installing TeamCal Pro has been made much easier with version 3.0. An installation script takes away the hassle of manually editing files to set up your individual environment. The recommended basic installation steps are:
- Unpack the TeamCal Pro archive to your local hard drive
- Copy the TeamCal Pro directories including all sub directories and files to the desired location at your web space
- Direct your browser to the location of your TeamCal Pro. The installation page will show.
- Enter all information as requested and click [Install]
That does not sound too difficult, does it?
I have done my best to keep it as straight forward and easy as possible. You techies scroll down to read more details...
|
Image: Installation screen |
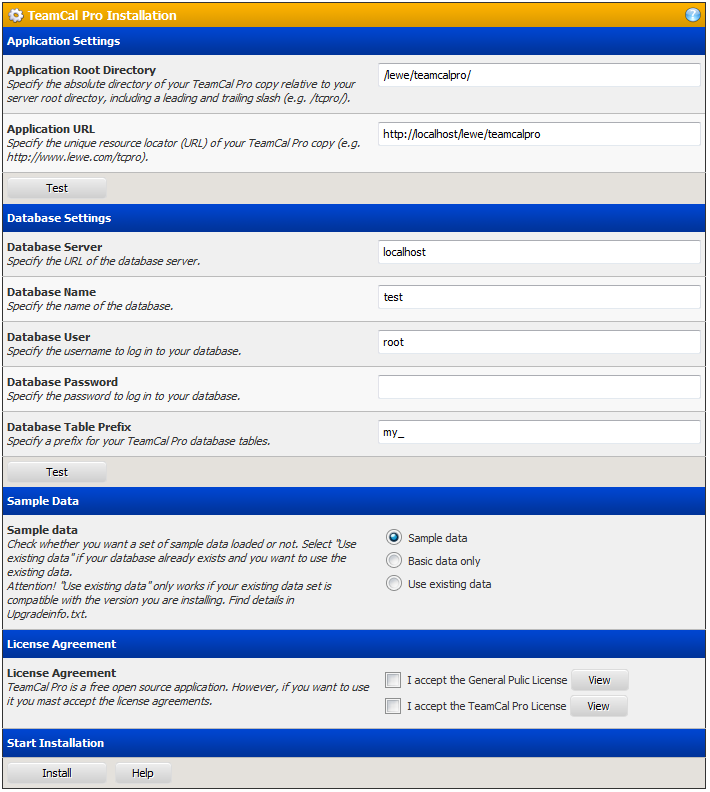
The Installation shows explanations to all entries. You should be able to figure it out quickly. Here are some more hints and examples.
Application Settings
Application Root Directory
The URL to your TeamCal Pro application (like http://tcpro.lewe.com) does usually not represent the directory path on your web server where TeamCal Pro resides. You can compare this in the Windows world with the icon "My Documents" pointing to a directory like "C:\Documents and Settings\SomeUsername\My Documents". Your web site resides in a certain and specific directory on the web server. TeamCal Pro needs this information to work properly and to know where certain files can be found.
Let's look at an example. Let's say you have bought web space from a provider. And let's say you have registered the domain "thisismydomain.com". Your URL to your web space will then be "http://www.thisismydomain.com", but the directory on the web server in the provider's data center will be something like "/customers/homepages/12345/htdocs". There is such a directory for each customer. TeamCal Pro needs to know this information.
But don't worry, you don't need to look that up. Let's say you connected to your web space via FTP and copied your local TeamCal Pro directory that you called "tcpro" right in your home directory on the web server. Then, in our example, the fully specified application root directory of TeamCal Pro would be "/customers/homepages/12345/htdocs/tcpro", right? But all you need to enter in the installation page is just the name of the TeamCal Pro folder, followed by a slash. Easy enough? That would be in our case "/tcpro/". When the installation page starts TeamCal Pro will already display the directory name it seems that your installation resides in.
You can use the [Test] button to see if your entries make sense to TeamCal Pro.
Application URL
Do I have to explain this again? I guess you know by now. When the installation page starts TeamCal Pro will already display the URL it seems that your installation is reachable at.
Database Settings
Now this is a bit more tricky and requires some knowledge about MySQL databases, depending on how good your provider is. When you buy web space from a provider you usually get access to a specific web site where you can set up your web space. One option usually is to create a MySQL database. It is more or less a matter of a few clicks in your browser and your database is ready to go. You will usually get a response about the database server name, database name and the user name and password to access it. Just take that information and enter it here.
You can use the [Test] button to see if your entries make sense to TeamCal Pro.
Sample Data
TeamCal Pro comes with a set of sample data. If you like to enter a few users and groups into your database upon installation just select "Sample Data" here. There are just a few, not too many to delete them after you have tested a few things with them. If you are familiar with TeamCal Pro from previous versions and don't need sample data, select "Basic Data". This will install all necessary initial settings, but now groups or users (except of 'admin').
The 'admin' user will be installed either way. His password is 'root'.
License Agreement
TeamCal Pro is free open source software, probably the thing you like most about it. However, it does not mean you can do anything with it. Is it not yours. It is just licensed to you for no money. You still have to agree and accept the license agreements that come with it. Please make sure you read and accept them. It is my work, my time and my sweat that makes this application work for you and I believe the least you can do for me is to honor these agreements.
Start Installation
After you have entered all information (use the [Test] buttons to verify your inputs) click the [Install] button to save your configuration and start TeamCal Pro.
Delete "installation.php"
Since you can set basic configuration data and even overwrite the database with the installation script, it is highly recommended to delete "installation.php" after a successful installation. If you don't do so, each time the admin logs in, a security warning message will pop-up, using the TeamCal Pro announcement feature.
From here on only the techies want to read...
Technical Details
The TeamCal archive contains two files, named config.default.php and installation.php. If these two files exist, and specifically no file named config.tcpro.php is present, the index.php will launch installation.php. After you have entered your installation info and have clicked the [Install] button, the file config.tcpro.php will be created and index.php will be reloaded.
Once index.php does not sees config.tpro.php nor installation.php an "Installation Corrupted" error message will display. In that case recover the installation.php file from your TeamCal Pro archive and direct your browser to TeamCal Pro again. The installation page will show automatically.
You can get further support at the Forum on http://www.lewe.com